Red White & Blue Marble Ice Cream
Red, white, and blue marble ice cream looks dramatic in the pan, but the real win is the texture: soft, creamy, and packed with bold fruit swirls that stay distinct…
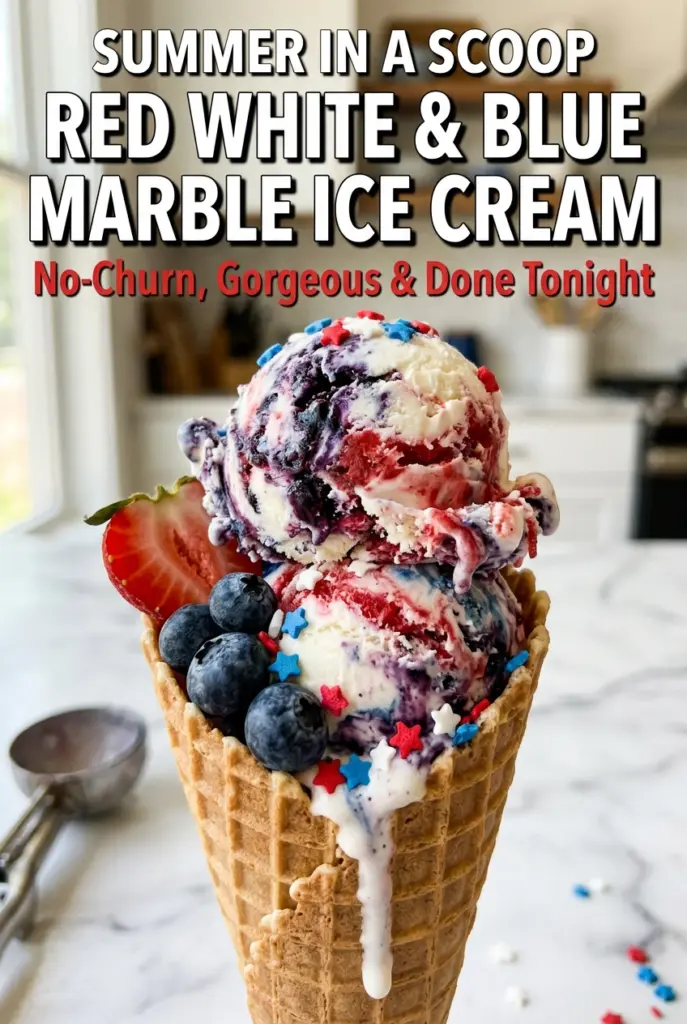
Tip: save now, cook later.Red, white, and blue marble ice cream looks dramatic in the pan, but the real win is the texture: soft, creamy, and packed with bold fruit swirls that stay distinct instead of disappearing into one pastel blur. Each scoop gives you sweet vanilla base, jammy strawberry, and deep blueberry in the same bite, which is exactly why this one disappears fast at summer gatherings.
The trick is cooking both fruit swirls down until they’re thick and glossy before they ever touch the cream. If the fruit is too loose, it turns icy and bleeds through the base while it freezes. Keeping the swirl mixtures fully cool before layering matters just as much — warm fruit melts the whipped cream and knocks out the light texture that makes no-churn ice cream work.
Below, I’ll walk you through the one part that keeps the marbling sharp instead of muddy, plus a few simple swaps if you need to adjust the fruit or make it ahead for a crowd.
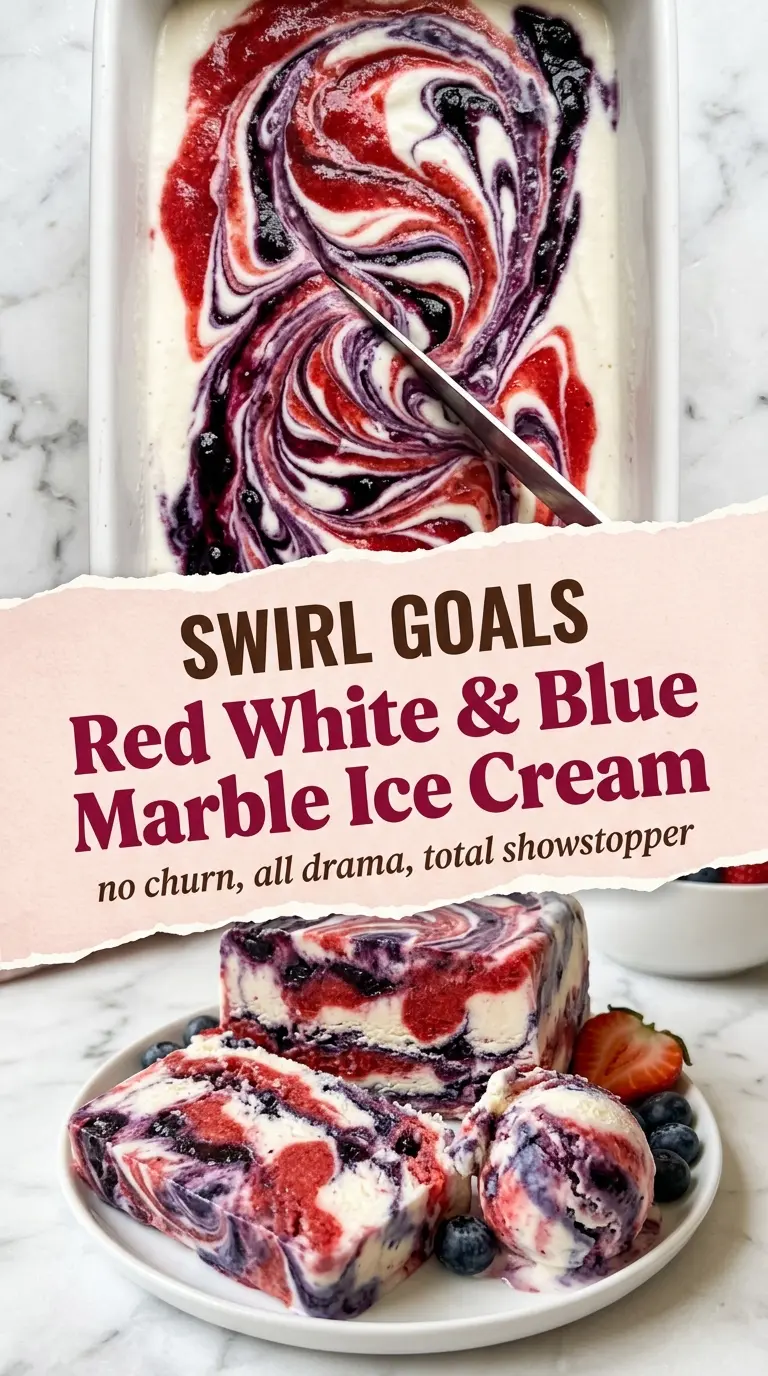
The strawberry and blueberry swirls thickened up perfectly, and the vanilla base stayed fluffy after folding. I only did a few knife passes like you said, and the colors came out so crisp instead of turning purple.
Red, white, and blue marble ice cream with crisp fruit swirls and a creamy no-churn finish is worth saving for your next summer celebration.
The Part That Keeps the Swirls Bold Instead of Muddy
The biggest mistake with marble ice cream is treating the fruit like a sauce. It needs to be cooked down until it’s closer to jam than syrup, or the extra water turns into ice crystals and the colors bleed together. Thick swirls sit where you drop them, which is what gives you those clean ribbons of red and blue against the white base.
Another place people lose the look is over-mixing after layering. Three or four wide passes with a knife or skewer is enough. If you keep stirring, the colors blend into one muted pink-purple pan, and the marbling is gone before the freezer even has a chance to set it.
- Strawberries and blueberries — Fresh berries give the cleanest fruit flavor and the best color. Frozen berries work too, and they’re a smart swap when fresh fruit is expensive, but they release more liquid, so give them the full cook time and don’t stop until the mixture is thick and glossy.
- Sweetened condensed milk — This is the backbone of the no-churn base. It sweetens and helps the ice cream stay scoopable without an ice cream maker. There isn’t a perfect substitute here; evaporated milk won’t give the same texture.
- Heavy whipping cream — This is what traps the air and makes the ice cream light instead of dense. You need it cold, and the bowl helps if it’s chilled too. If you overwhip it, the base turns grainy and the final texture gets icy, so stop at stiff peaks.
- Lemon juice — A little acid sharpens both fruit swirls and keeps them tasting bright after freezing. It’s a small amount, but it matters because frozen desserts mute flavor. Bottled juice will work in a pinch, though fresh lemon tastes cleaner.
- Vanilla extract — Vanilla rounds out the base and keeps the fruit from tasting one-dimensional. Use real vanilla if you have it; imitation works here, but the flavor will be flatter in a dessert with so few ingredients.
How to Layer the Pan Without Losing the Marble
Cook the Fruit Until It Tastes Jammy
Put the strawberries and blueberries in separate small saucepans with sugar and lemon juice, then cook them over medium heat until the berries break down and the mixture thickens. You’re looking for a spoon-coating texture, not a loose compote. If you drag a spoon through the pan and the line holds for a second, you’re in the right place. Pull the fruit off the heat before it starts sticking hard to the bottom.
Whip the Cream Just to Stiff Peaks
Beat the cold cream in a chilled bowl until the peaks stand up when you lift the beaters. It should look billowy and hold shape, but not look dry or chunky. Overwhipped cream doesn’t fold smoothly into the condensed milk, and that’s where you lose the airy texture. If it starts looking slightly rough, stop immediately and move on.
Fold, Layer, and Swirl Once
Stir the sweetened condensed milk, vanilla, and salt into the whipped cream with a gentle folding motion so you don’t knock out the air. Spread half of the base in the loaf pan, dot on half the fruit swirls, then repeat with the remaining base and fruit. Use a knife or skewer to drag wide S-shapes through the pan only a few times. The goal is ribboned streaks, not a fully mixed pan.
Freeze Until the Center Is Firm
Press plastic wrap directly onto the surface before freezing so ice doesn’t form on top. Let it set for at least 6 hours, though overnight gives you the cleanest slices and the best scoopable texture. If you try to serve it too early, the outer edges will seem ready while the center stays soft and slumps into the scoop. Give it five minutes on the counter before serving so the spoon can glide through cleanly.
How to Change the Fruit, the Sweetness, or the Make-Ahead Plan
Make it with frozen berries
Frozen strawberries and blueberries work well here and are often easier to find in good condition than fresh fruit out of season. Don’t thaw them first; cook them straight from frozen so they break down evenly. The only tradeoff is a little extra moisture, which means you may need an extra minute or two on the stove to get the swirls thick enough.
Turn it into a dairy-free dessert
Use a thick coconut whipping cream in place of heavy cream and swap in a dairy-free sweetened condensed milk product. The texture will be a little softer and the coconut flavor will come through, but the marbling and scoopable finish still work. Keep everything well chilled before whipping so the base holds enough air.
Dial the sweetness down slightly
If your berries are very ripe, you can reduce the sugar in each swirl by 1 teaspoon. Don’t cut the condensed milk base, because that changes the structure, not just the sweetness. The fruit still needs enough sugar to thicken properly and stay soft after freezing.
Storage and Reheating
- Refrigerator: Don’t store this in the fridge; it melts fast and loses the frozen texture.
- Freezer: Keeps well for up to 2 weeks in a tightly covered loaf pan or airtight container. After that, it can pick up freezer flavor and the fruit swirls get a little icier.
- Reheating: Let it sit at room temperature for 5 to 10 minutes before scooping. If it’s rock hard, the freezer is too cold or it needs a little more thaw time; don’t microwave it or the edges will melt before the center is scoopable.
Answers to the Questions Worth Asking

Red White & Blue Marble Ice Cream
Ingredients
Equipment
Method
- Combine chopped fresh strawberries, 2 tbsp granulated sugar, and 1 tsp lemon juice in a small saucepan over medium heat. Cook for 8–10 minutes, stirring occasionally, until the mixture breaks down and turns jammy.
- Remove the strawberry mixture from the heat and mash slightly. Let it cool completely before using.
- Combine fresh blueberries, 2 tbsp granulated sugar, and 1 tsp lemon juice in a small saucepan over medium heat. Cook for 8–10 minutes, stirring occasionally, until thick and deeply colored.
- Remove the blueberry mixture from the heat and mash slightly. Let it cool completely before using.
- In a large chilled bowl, beat cold heavy whipping cream with a hand mixer on high until stiff peaks form, about 3–4 minutes. Do not over-whip.
- Gently fold the sweetened condensed milk, pure vanilla extract, and a pinch of salt into the whipped cream until fully combined. Mix just until fluffy and not deflated.
- Pour half the ice cream base into a 9x5 loaf pan. Drop spoonfuls of the strawberry swirl and blueberry swirl over the base layer, using about half of each.
- Layer the remaining ice cream base on top of the swirls. Add the remaining strawberry swirl and blueberry swirl on top.
- Run a knife or skewer through the pan in wide S-shaped strokes, 3–4 passes only. Stop after 3–4 passes to keep bold, defined red, white, and blue ribbons.
- Cover tightly with plastic wrap, pressing it directly onto the surface. Freeze for at least 6 hours, preferably overnight, until completely set.
- Remove the ice cream from the freezer 5 minutes before scooping. Scoop into bowls or cones and top with sliced fresh strawberries, fresh blueberries, and white sprinkles or star-shaped confetti sprinkles before serving immediately.
