
Lemon Ricotta Stuffed Chicken Breast
Golden-seared chicken with a creamy lemon ricotta center has a way of making an ordinary dinner feel considered. The outside picks up a savory crust in the skillet, then the…
Tip: save now, cook later.Golden-seared chicken with a creamy lemon ricotta center has a way of making an ordinary dinner feel considered. The outside picks up a savory crust in the skillet, then the filling stays soft and rich inside, so every slice gives you juicy chicken and a bright, herb-packed middle. It tastes polished, but it doesn’t ask for much more than a sharp knife and one good pan.
What makes this version work is the balance. Whole milk ricotta keeps the filling lush without turning heavy, while lemon zest carries more punch than juice alone and fresh basil keeps the whole thing from tasting flat. The chicken gets seasoned on the outside before it’s stuffed, which means the flavor doesn’t stop at the filling. It all builds in layers.
Below, you’ll find the trick for cutting a clean pocket without splitting the breast, the reason a quick sear matters before the oven, and a few swaps if you need to work with what’s already in your kitchen.
The ricotta stayed creamy and never leaked out, and the lemon zest made the filling taste bright instead of heavy. I followed the sear time exactly and the chicken came out juicy with that nice golden crust.
Save this lemon ricotta stuffed chicken breast for the nights when you want a creamy filling, a crisp golden sear, and dinner that feels special without extra fuss.
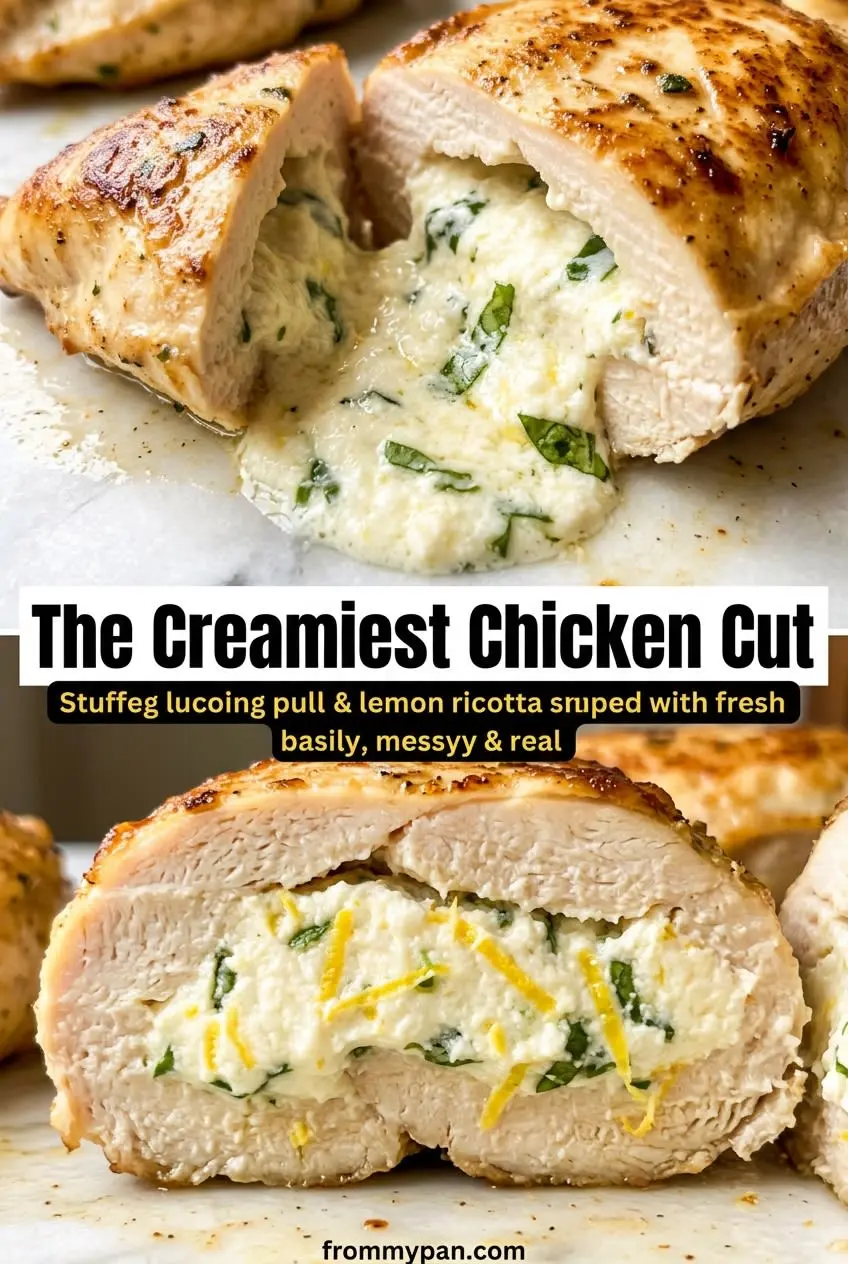
The Pocket Is Where This Chicken Lives or Dies
The biggest mistake with stuffed chicken breast is cutting the pocket too thin or too deep. If you slice straight through the breast, the filling escapes and the chicken cooks unevenly. If the pocket is too shallow, the ricotta sits on top instead of inside, and you lose the whole point of the dish.
Use a sharp knife and work from the thickest side, stopping before you reach the opposite edge. You want a deep pouch with enough structure left to hold the filling during searing. That thickness also helps the chicken stay juicy in the oven, because the stuffing acts like a little internal buffer against overcooking.
- Chicken breasts — Large, even breasts are easier to stuff and cook more predictably. If yours are very thick on one end, lightly pound the thicker side first so the breast cooks at a steadier rate.
- Whole milk ricotta — This gives the filling its creamy body. Low-fat ricotta can work, but it tends to taste grainier and doesn’t stay as plush once heated.
- Lemon zest — This is where the bright lemon flavor really comes from. Juice adds sharpness, but zest carries the aromatic oils that make the filling taste fresh instead of sour.
- Fresh basil — Dried basil won’t give you the same clean, green lift. If you need a swap, chopped parsley works better than dried herbs here because it keeps the filling light.
- Parmesan — A little goes a long way. It seasons the filling from the inside and helps it taste savory rather than just creamy.
The 10 Minutes That Build the Best Texture
Mix the filling first
Stir the ricotta, lemon zest, lemon juice, garlic, basil, and Parmesan together before you touch the chicken. The filling should look thick, spoonable, and just loose enough to mound. If it seems watery, the chicken will leak during cooking, so use a drier ricotta or drain it briefly in a fine mesh strainer.
Cut a pocket, not a tunnel
Slide the knife into the thick side of each breast and cut horizontally, stopping about half an inch before the far edge. Keep the opening fairly wide so you can spoon the filling in without tearing the meat. If the chicken splits along the seam, the pocket was cut too close to the surface.
Sear before the oven
Heat the oil until it shimmers, then add the stuffed breasts and leave them alone long enough to form a crust. That crust is what gives you color and flavor before the chicken goes into the oven. If the pan is too cool, the chicken steams and the filling can loosen instead of staying tucked inside.
Bake just until the center is done
Move the skillet to the oven and cook until the thickest part of the chicken reaches 165°F. Pull it at temperature, not after it climbs well beyond that, or the lean breast meat will dry out. Rest the chicken for a few minutes before slicing so the juices settle back into the meat instead of running onto the cutting board.
What to Change When You Need a Different Version
Dairy-Free Stuffed Chicken
Use a thick dairy-free ricotta-style cheese and a little extra Parmesan-style substitute if you have one. The filling won’t be quite as lush as whole milk ricotta, but the lemon and basil still keep it bright and clean.
Gluten-Free by Default
This recipe is naturally gluten-free as written, so there’s nothing to change. Just check your Parmesan and any seasoning blends to be sure they don’t include starches or fillers.
Spinach and Ricotta Version
Fold in a handful of very well-squeezed chopped spinach for a fuller filling and a little more color. The key is squeezing out moisture first, or the spinach will thin the ricotta and make the chicken harder to seal.
Make-Ahead for Busy Nights
Stuff the chicken up to 24 hours ahead, cover it, and refrigerate it until you’re ready to cook. This saves time and actually helps the filling firm up a little, which makes the chicken easier to sear cleanly.
Storage and Reheating
- Refrigerator: Store leftovers for up to 3 days. The chicken stays juicy, though the ricotta filling firms up a bit once chilled.
- Freezer: Freeze cooked chicken only if you need to. The texture is acceptable, but the ricotta filling can turn a little grainy after thawing.
- Reheating: Warm it gently in a 300°F oven, covered loosely with foil, until heated through. High heat dries out the chicken fast and can make the filling separate.
Answers to the Questions Worth Asking
Lemon Ricotta Stuffed Chicken Breast
Ingredients
Equipment
Method
- Mix ricotta, lemon zest, lemon juice, minced garlic, fresh basil, and Parmesan in a bowl, then season with salt and black pepper to taste.
- Set the ricotta filling aside while you prepare the chicken so it stays ready to spoon.
- Pat the chicken breasts dry with paper towels for better browning.
- Cut a deep pocket into the thickest side of each chicken breast, being careful not to cut all the way through.
- Mix garlic powder, onion powder, smoked paprika, salt, and black pepper, then rub the seasoning all over the outside of each chicken breast.
- Spoon the ricotta filling generously into each pocket.
- Secure the opening with 1–2 toothpicks to keep the filling inside during cooking.
- Heat olive oil in an oven-safe skillet over medium-high heat, then sear chicken for 3–4 minutes per side until deeply golden brown.
- Transfer the skillet to a preheated oven at 375°F (190°C) and bake for 18–20 minutes until the internal temperature reaches 165°F (74°C).
- Remove toothpicks, then let the chicken rest for 5 minutes before slicing.
- Serve with a squeeze of fresh lemon juice and extra basil on top.
