Coconut Domes with Chocolate Spread
Golden coconut domes with a soft, chewy center and a crisp toasted edge hit that sweet spot between cookie, candy, and elegant little dessert. The shell holds its shape just…
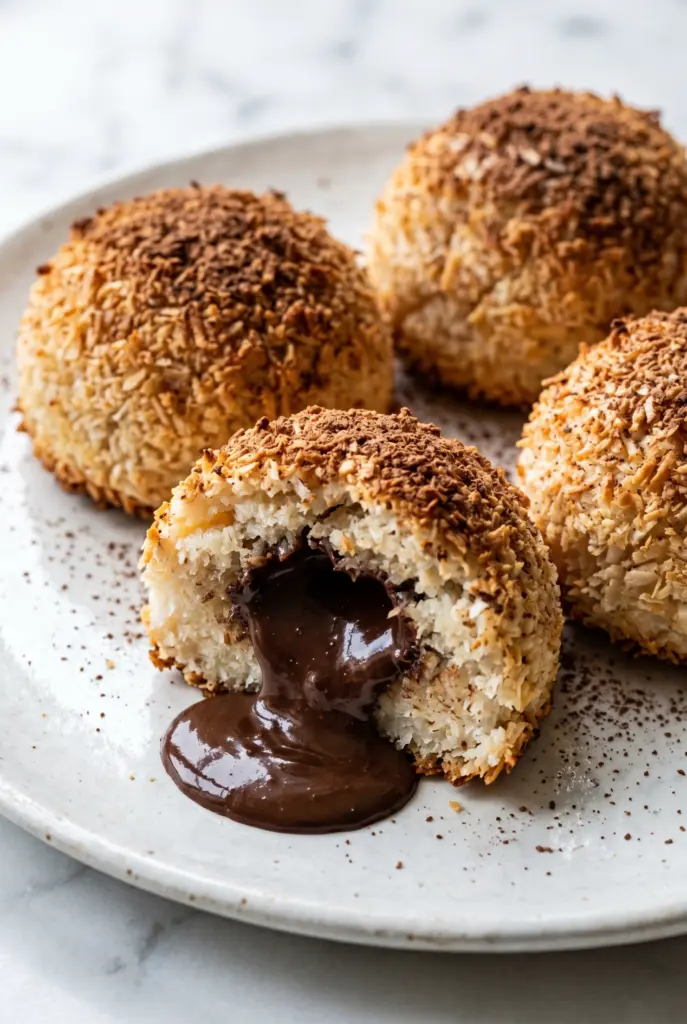
Tip: save now, cook later.Golden coconut domes with a soft, chewy center and a crisp toasted edge hit that sweet spot between cookie, candy, and elegant little dessert. The shell holds its shape just enough to cradle the chocolate spread, but the bite stays light instead of dense. What makes them memorable is the contrast: nutty coconut on the outside, warm dark chocolate inside, and a finish that turns each one into a two-texture bite worth slowing down for.
The shell works because the coconut gets bound with lightly whisked egg whites, a little flour, and sugar before it goes into the mold. That combination helps the domes bake up cohesive without turning cakey. The other detail that matters is cooling them completely before unmolding. If you rush that part, the edges can crumble and the hollow center can collapse before you ever reach the filling.
Below, I’ve laid out the small things that matter here: how to keep the coconut mixture from falling apart, why the chocolate spread stays smooth instead of grainy, and the easiest way to adapt these domes if you need a dairy-free version.
The domes held together perfectly and the coconut got that deep toasted edge without drying out. I also loved that the chocolate stayed soft in the center instead of turning stiff.
Save these coconut domes for the next time you want a crisp coconut shell and a silky chocolate center in one bite.
The Part That Keeps Coconut Domes from Falling Apart
These domes depend on structure, not batter. That’s the big thing to understand. The egg whites aren’t there to create lift the way they would in a meringue; they’re there to moisten and bind the coconut just enough that it presses into a mold and bakes into a shell. If you whip them to stiff peaks, the mixture gets airy and unstable instead of compact, and the domes won’t hold a clean hollow.
The other common problem is underbaking. Coconut needs enough time in the oven to toast, dry out slightly, and set into a shell you can unmold. Pull them too soon and the centers stay fragile; leave them until the edges turn a deep gold and the coconut smells nutty, and they release much more cleanly once cooled.
- Pressing the mixture firmly helps the shell stay intact. Loose packing leaves gaps that break when you unmold.
- Cooling in the mold matters more than people think. The domes tighten as they cool, and that’s what lets them come out in one piece.
- Using a silicone mold gives you the easiest release. A muffin tin works too, but you need to be patient and gentle.
What Each Ingredient Is Doing in This Dish
- Desiccated coconut is the backbone here. Unsweetened coconut gives the best control over the final sweetness and toasts beautifully without turning syrupy.
- Egg whites bind the coconut without making the domes heavy. They should be frothy, not whipped dry, or the mixture gets harder to press evenly.
- Granulated sugar sweetens and also helps the coconut brown. It’s one of the reasons the edges turn crisp instead of staying pale and chewy.
- Flour adds a small amount of structure. It’s not there to make these cakey; it just helps the shells hold together once baked.
- Dark chocolate gives the filling its depth. A 70% bar keeps the center from tasting overly sweet and stands up well against the coconut.
- Heavy cream and butter make the spread glossy and spoonable. If you use a lower-fat cream, the filling won’t stay as silky.
Building the Shell, Then Filling It at the Right Moment
Getting the Coconut Mixture Ready
Start with egg whites that are only frothy, not foamy or stiff. Once the sugar, vanilla, salt, and flour go in, the mixture should look a little loose before the coconut is folded through. That’s normal. The coconut drinks up the moisture as it sits, and by the time you portion it, it should press together in your hand without dripping or crumbling apart.
Shaping the Domes
Pack 2 to 3 tablespoons into each cavity and press it up the sides with your fingers or the back of a spoon. The center should stay hollow, but the shell needs enough thickness to hold the chocolate later. If the wall is too thin, it will crack when you unmold it; if it’s too thick, the texture turns dense and you lose that delicate contrast.
Baking Until the Coconut Turns Nutty
Bake until the edges are deep golden and the coconut smells toasted, not just warmed. That’s the point where the shell has enough structure. If the tops are still pale, they usually stick and collapse. Once they come out, leave them alone until they’re completely cool. Warm domes are fragile domes.
Making the Chocolate Spread Smooth
Heat the cream until it’s steaming but not boiling, then pour it over the chopped chocolate and wait a full 2 minutes before stirring. That pause lets the chocolate soften evenly. If the mixture looks grainy, the cream was too hot or the chocolate wasn’t fully melted before you stirred in the butter. Keep stirring gently until it turns glossy and thick enough to spoon.
Filling Without Breaking the Shell
Spoon the chocolate in only after the domes have released and cooled. A warm shell can soften at the base and lose its shape. If you want a firmer center, let the filled domes sit in the fridge until the chocolate sets. If you want that molten middle, serve them right away.
How to Adapt These Coconut Domes Without Losing the Good Part
Dairy-Free Filling
Use full-fat coconut cream instead of heavy cream and swap the butter for a dairy-free butter or leave it out entirely. The filling will still set, but it will taste a little less rich and a little more chocolate-forward. Chill it briefly before filling the domes if it seems too loose.
Gluten-Free Version
Replace the all-purpose flour with a fine gluten-free flour blend in the same amount. The domes stay close to the original texture, though they may be a touch more delicate when unmolding. Let them cool fully before you move them.
Less Bitter Chocolate Center
Use 50% to 60% dark chocolate instead of 70% if you want a softer, sweeter filling. The tradeoff is less contrast against the coconut, but the dessert reads more like a classic chocolate truffle filling.
Storage and Reheating
- Refrigerator: Store in an airtight container for up to 4 days. The coconut shell softens slightly as it sits, while the chocolate center firms up.
- Freezer: Freeze the baked, unfilled domes for up to 1 month. Thaw at room temperature, then fill them fresh for the best texture.
- Reheating: There’s no real reheating needed here. If the filled domes are chilled and you want the center softer, let them sit at room temperature for 10 to 15 minutes before serving.
Answers to the Questions Worth Asking

Coconut Domes with Chocolate Spread
Ingredients
Equipment
Method
- Preheat your oven to 175°C (350°F) and lightly grease a dome-shaped silicone mold or round muffin tin with melted butter.
- In a large bowl, whisk the egg whites until frothy but not stiff—about 1 minute by hand.
- Add sugar, vanilla, salt, and flour to the egg whites and stir to combine.
- Fold in the desiccated coconut until fully coated and the mixture holds together when pressed.
- Press 2–3 tablespoons of the coconut mixture firmly into each dome cavity, building up the sides and base to create a shell, then leave the center hollow.
- Bake for 18–22 minutes, until the edges are deep golden and the coconut is toasted and fragrant.
- Remove from the oven and allow to cool completely in the mold before unmolding.
- Heat the heavy cream in a small saucepan over medium-low heat until just steaming.
- Pour the hot cream over the chopped dark chocolate and let sit for 2 minutes.
- Stir until smooth and glossy.
- Add butter, powdered sugar, vanilla, and salt, then stir until silky.
- Flip the domes out carefully and spoon a generous amount of warm chocolate spread into the hollow center of each dome.
- Serve immediately while the chocolate is still molten, or refrigerate until set; dust with cocoa powder or flaked sea salt if desired.
