No Bake Fruit Tart
Fresh fruit, creamy vanilla filling, and a buttery graham cracker crust turn this no bake fruit tart into the kind of dessert people hover around at the table. The crust…
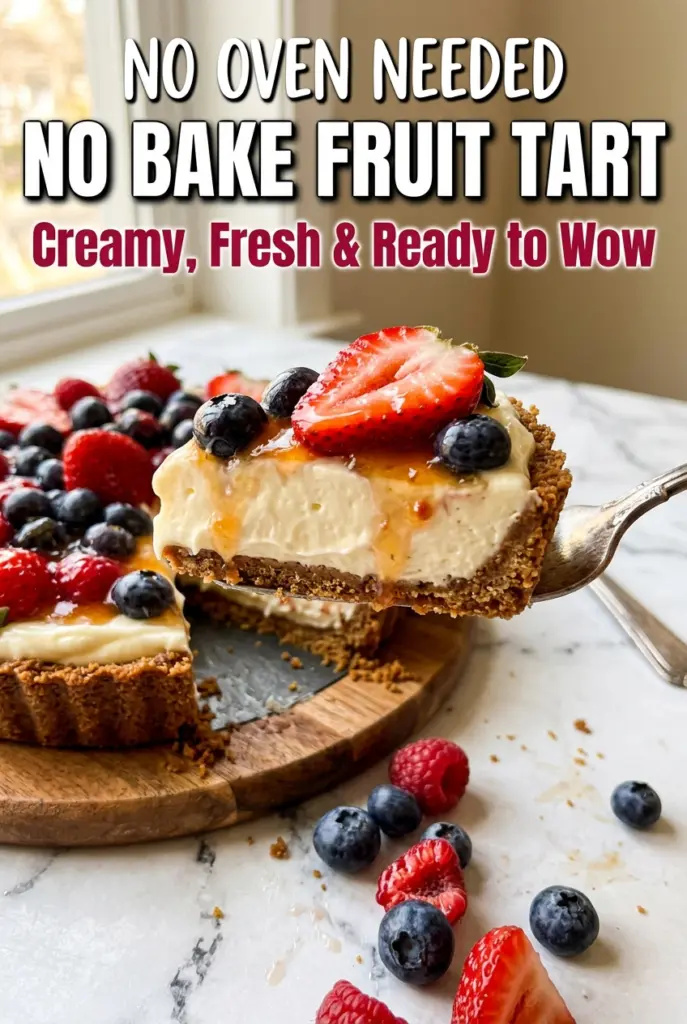
Tip: save now, cook later.Fresh fruit, creamy vanilla filling, and a buttery graham cracker crust turn this no bake fruit tart into the kind of dessert people hover around at the table. The crust stays crisp enough to slice cleanly, the filling sets up light and smooth, and the fruit on top gives every bite a little sweet-tart snap. It looks polished, but it doesn’t ask for oven time or fussy pastry work.
What makes this version work is the balance. The cream cheese gives the filling enough structure to hold its shape, while the whipped cream keeps it from tasting heavy. Freezing the crust before filling it helps it stay firm, and chilling the tart long enough matters just as much as the mixing. If you rush either one, the slices slump instead of standing up tall.
Below, you’ll find the small details that matter most: how to get the crust packed tightly, how to fold the filling so it stays airy, and how to arrange the fruit so it looks like you spent a lot longer on it than you did.
The filling set up beautifully and sliced clean after two hours in the fridge. I used strawberries and kiwi, and the apricot glaze gave it that shiny bakery look without making the fruit soggy.
Love the creamy filling and glossy fruit topping on this no bake fruit tart? Save it to Pinterest for the next time you need a chilled dessert that looks elegant without turning on the oven.
The Crust Needs More Pressure Than You Think
A no bake tart crust fails in one of two ways: it crumbles when you slice it, or it turns sandy and loose because the crumbs never got packed firmly enough. The butter holds the crumbs together, but compression is what gives the crust its clean edge and stable sides. Pressing it with the bottom of a glass or measuring cup does more than smooth it out — it locks the structure in place before the filling goes in.
The freezer step matters here. Fifteen minutes gives the butter a chance to firm up, which keeps the crust from shifting when you spread in the filling. If your kitchen is warm and the crust feels greasy or soft, give it a few extra minutes in the freezer before moving on.
What Each Ingredient Is Actually Doing in This Tart

The graham cracker crumbs bring both flavor and structure. Store-bought crumbs are fine here, but if you crush them yourself, aim for a fine, even texture so the crust packs tightly. The melted butter should coat every crumb and leave the mixture looking like damp sand; if it looks dusty, the crust will break apart later.
Cream cheese is the backbone of the filling. Full-fat works best because it beats smooth and sets firmly after chilling. If it’s not softened first, you’ll get little lumps that never fully disappear, so let it sit out until it yields easily to a finger press. The powdered sugar sweetens without making the filling gritty, and sifting it helps keep the texture silky.
Cold heavy cream is what lightens the filling and gives it that mousse-like lift. Whip it to stiff peaks before folding it in, but stop there — if you overwhip, the mixture can turn grainy and the folding gets messy. The fruit is the finishing layer, so pick pieces that are ripe but still firm enough to hold their shape after glazing.
- Apricot jam — This makes the glossy finish. Warm it with a little water so it brushes on thinly; a thick glaze can pool and slide off the fruit.
- Vanilla extract — Use pure vanilla if you can. It gives the filling a rounded, bakery-style flavor that stands up to all the fresh fruit.
- Kiwi, strawberries, blueberries, and raspberries — A mix of sizes and colors makes the tart look abundant. Dry the fruit well after washing so extra moisture doesn’t seep into the topping.
Building the Filling Without Losing the Air
Smooth the Cream Cheese First
Beat the softened cream cheese until it’s completely smooth before adding anything else. This is the point where lumps get eliminated, and once the sugar goes in, they’re harder to chase down. If the cream cheese still looks chilly in the middle, keep mixing until the bowl looks glossy and even.
Whip the Cream to Stiff Peaks
Use a cold bowl if you have one, and whip the cream until it holds tall peaks that don’t slump over. That structure is what gives the tart body without making it dense. If the cream looks soupy, it hasn’t gone far enough; if it looks grainy or starts to separate, it went too far.
Fold, Don’t Stir
Add the whipped cream to the cream cheese mixture in two additions and fold gently with a spatula. Stirring knocks out the air and leaves the filling heavier than it should be. Stop as soon as the mixture looks uniform, because a few faint streaks disappear on their own with a couple more folds.
Chill Until It Slices Cleanly
Spoon the filling into the crust and smooth the top, then refrigerate for at least two hours. The tart needs that time for the filling to firm up all the way through. If you cut it early, the center will ooze and the crust will press out of shape, so patience pays off here.
How to Adapt This for Different Fruits, Diets, and Timing
Make it gluten-free with one swap
Use gluten-free graham-style crumbs or another gluten-free cookie crumb in the crust. Keep the butter and sugar amounts the same, but check that the crumbs are fine enough to press together well. The filling and fruit already fit naturally into a gluten-free dessert.
Go dairy-free with a different filling base
Swap in a dairy-free cream cheese and a whipped coconut cream topping for the filling. The texture will be a little softer and the flavor will lean slightly coconut, but the tart still chills up nicely if you give it enough time in the fridge.
Change the fruit to match what’s best
Blackberries, mango, peaches, and grapes all work here as long as they’re firm and well drained. Softer fruit like very ripe peaches can weep if they sit too long under the glaze, so add them close to serving.
Storage and Reheating
- Refrigerator: Keep covered for up to 3 days. The crust softens a bit as it sits, but the tart still slices well if it stays chilled.
- Freezer: The filled tart can be frozen without the fruit topping for up to 1 month. Thaw it overnight in the refrigerator, then add the fruit and glaze just before serving.
- Reheating: This tart isn’t meant to be reheated. Serve it cold straight from the refrigerator, and use a sharp knife wiped clean between slices for the neatest cuts.
Answers to the Questions Worth Asking

No Bake Fruit Tart
Ingredients
Equipment
Method
- In a medium bowl, combine graham cracker crumbs, melted butter, granulated sugar, and salt. Mix until the texture resembles wet sand and holds together when pressed (visual cue: it clumps when you squeeze it).
- Press the crumb mixture firmly and evenly into the bottom and up the sides of a 9-inch tart pan with a removable bottom. Use the back of a spoon or flat-bottomed glass to compact it well (visual cue: an even, tightly packed crust).
- Place the crust in the freezer for 15 minutes to firm up while you prepare the filling (visual cue: it feels set and less crumbly).
- In a large bowl, beat the softened cream cheese with a hand mixer until completely smooth and lump-free, about 2 minutes (visual cue: no visible cream cheese lumps).
- Add the powdered sugar and vanilla extract, then beat on medium speed until fully incorporated and fluffy (visual cue: the mixture looks lighter and smoother).
- In a separate chilled bowl, whip the cold heavy cream to stiff peaks using a hand mixer or stand mixer on high speed (visual cue: peaks stand straight when you lift the beaters).
- Gently fold the whipped cream into the cream cheese mixture in two additions, using a rubber spatula. Fold until just combined and no streaks remain—keep it light and airy (visual cue: uniform filling with no white streaks).
- Spoon the cream filling into the chilled crust and spread it evenly with an offset spatula, smoothing the top (visual cue: level surface with sharp edges at the crust line).
- Refrigerate the filled tart for at least 2 hours (or up to overnight) until the filling is firm and set (visual cue: it jiggles minimally when the pan is gently tapped).
- Just before serving, arrange the fresh fruit decoratively over the top, starting from the outer edge and working inward or in concentric circles (visual cue: neat, overlapping fruit pattern).
- Warm the apricot jam with 1 tsp warm water in a small bowl and brush gently over the fruit for a glossy, bakery-style glaze (visual cue: fruit looks shiny without dripping).
- Remove the tart from the pan, slice with a sharp knife, and serve immediately or keep refrigerated until ready to serve (visual cue: clean slices hold their shape).
