Red White and Blue Cupcakes
Moist vanilla cupcakes with tall swirls of red, white, and blue buttercream are the kind of dessert that disappears fast because they look festive and taste like the best bakery-style…
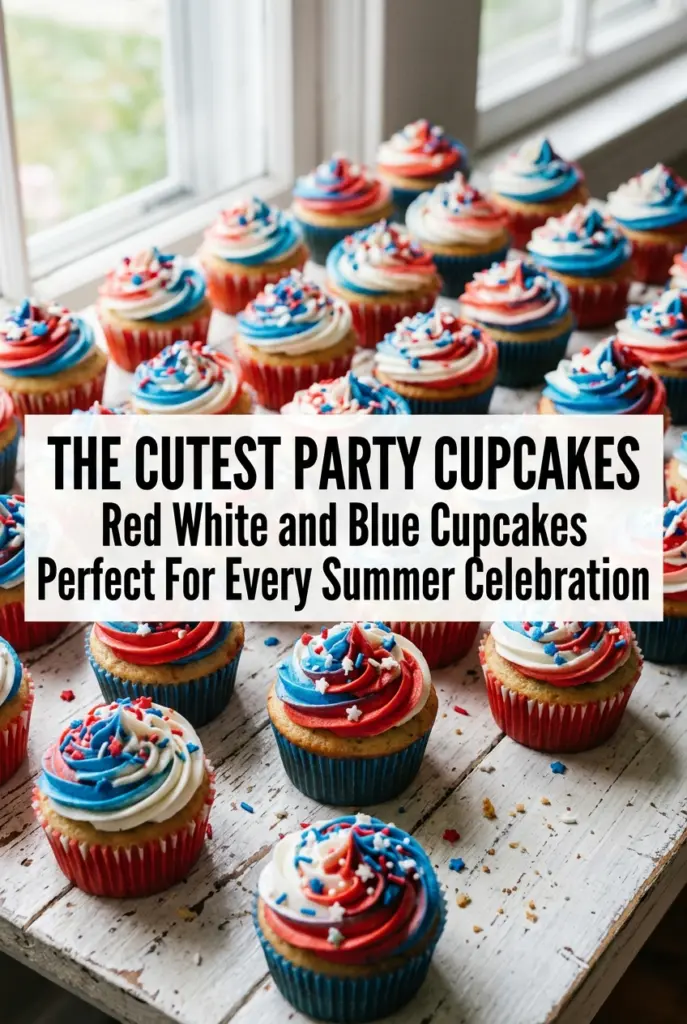
Tip: save now, cook later.Moist vanilla cupcakes with tall swirls of red, white, and blue buttercream are the kind of dessert that disappears fast because they look festive and taste like the best bakery-style birthday cupcake at the same time. The crumb stays soft, the frosting pipes cleanly, and the colors bring instant celebration without needing a fussy decorating setup.
What makes these work is a simple vanilla batter that bakes up tender instead of dry. The butter and sugar get beaten until pale and fluffy, which gives the cupcakes a lighter texture, and the milk is added in turns with the dry ingredients so the batter stays smooth instead of tight. For the frosting, the key is to beat the butter until it’s creamy before the powdered sugar goes in, then divide and tint it after it’s fully mixed so each color stays bright and easy to pipe.
Below, you’ll find the small details that matter most, including how to get those patriotic swirls in one piping bag and how to keep the colors bold without turning the frosting greasy or muddy.
The cupcakes baked up with a soft, even crumb and the frosting swirls held their shape perfectly. I was worried the red and blue would blend together, but they stayed crisp in the piping bag and looked gorgeous with the sprinkles.
Red, white, and blue cupcakes with bakery-style swirls are worth saving for your next patriotic celebration.

The Trick to Keeping the Cupcake Crumb Soft Under a Heavy Frosting Swirl
These cupcakes need a batter that can stand up to a generous swirl of buttercream without tasting dense. The usual mistake is overmixing once the flour goes in, which develops too much gluten and turns a tender vanilla cupcake into something more bready and tight. Mixing just until the last streaks disappear keeps the crumb soft and light.
Baking time matters too. Pull them when the tops spring back and a toothpick comes out with a few moist crumbs, not when they look deeply browned. Cupcakes keep cooking for a minute in the pan, and if they go in the oven too long, the frosting has to hide a dry base.
- Butter — Use softened butter for both the cupcakes and the frosting. It traps air when beaten with sugar, which helps the cupcakes rise and gives the frosting that smooth, pipeable texture. Cold butter won’t cream properly, and melted butter changes the structure completely.
- Vanilla extract — This is the background flavor that keeps the cupcakes from tasting flat. A good vanilla makes a difference here because the batter and frosting are both simple. I wouldn’t bother with imitation vanilla in a dessert this plain unless that’s all you have.
- Whole milk — The fat in whole milk helps the crumb stay moist. Lower-fat milk will work, but the cupcakes can bake up a little drier. If that’s what you’ve got, stop mixing the moment the batter comes together and don’t add any extra flour.
- Gel food coloring — Gel coloring gives you strong red and blue shades without thinning the frosting. Liquid coloring adds too much moisture and can make the buttercream soft. A little goes a long way, so add it gradually until you hit the shade you want.
Building the Batter and Swirling the Frosting Without Losing the Colors
Creaming the Base
Beat the butter and sugar until the mixture turns pale and fluffy, not just combined. That step builds the tiny air pockets that help the cupcakes rise and keeps the crumb tender. If the butter is still cold, the mixture will look sandy and the cupcakes won’t lift the same way.
Adding the Dry Ingredients in Turns
Whisk the flour, baking powder, and salt first so the leavening is evenly distributed. Then alternate the dry ingredients with the milk, ending with the dry mix. This keeps the batter smooth and prevents overworking it, which is the fastest way to tough cupcakes.
Baking Until the Centers Spring Back
Fill the liners about two-thirds full so the cupcakes bake up with flat, pipeable tops instead of overflowing domes. Bake just until the centers spring back when touched and a tester comes out with moist crumbs. If the tops sink, they were underbaked; if the edges turn dark and the tops feel dry, they went too far.
Making the Three-Tone Frosting
Beat the butter until creamy before adding the powdered sugar in batches. Once the frosting is smooth, divide it and tint each bowl separately so the colors stay clean. Pipe the three frostings side by side in the bag, not mixed together, or you’ll end up with a marbled look instead of distinct patriotic swirls.
How to Adapt These Cupcakes for Different Crowds and Different Kitchens
Dairy-Free Version
Use plant-based butter in both the cupcakes and frosting, and swap the whole milk for an unsweetened dairy-free milk with some body, like oat milk. The cupcakes will still bake up soft, but the frosting may be a touch less rich and a little softer, so chill it briefly before piping if your kitchen is warm.
Extra-Defined Swirls
If you want cleaner bands of color, chill the frosting for 10 to 15 minutes after tinting, then load the piping bag carefully with a spoon. Slightly firmer buttercream holds sharper ridges and keeps the red and blue from bleeding into the white as you pipe.
Gluten-Free Swap
A good 1:1 gluten-free baking flour can work here because the recipe is already light and cake-like. Let the batter rest for 10 minutes before baking so the flour hydrates evenly, and don’t overmix or the texture can turn gummy.
Storage and Reheating
- Refrigerator: Store frosted cupcakes in an airtight container for up to 4 days. The cake stays moist, but the frosting firms up a bit in the fridge.
- Freezer: Freeze unfrosted cupcakes for up to 2 months. Wrap them tightly once cool, then thaw at room temperature before frosting for the best texture.
- Reheating: Cupcakes don’t need reheating, but if they’ve been chilled, let them sit at room temperature for 30 to 45 minutes before serving. Cold buttercream tastes dense and the crumb loses its softness if served straight from the fridge.
Answers to the Questions Worth Asking

Red White and Blue Cupcakes
Ingredients
Equipment
Method
- Preheat oven to 350°F and line a muffin pan with cupcake liners for easy release after baking.
- Whisk all-purpose flour, baking powder, and salt until evenly combined.
- Beat unsalted butter and granulated sugar until light and fluffy, creating a stable base for the batter.
- Add eggs one at a time, mixing well after each addition, then mix in vanilla extract.
- Alternate adding the dry ingredients and whole milk, mixing just until combined to keep the cupcakes tender.
- Fill cupcake liners about ⅔ full for a domed, not overfilled, cupcake shape.
- Bake for 18–20 minutes at 350°F, until the tops spring back when lightly pressed.
- Cool completely before frosting so the buttercream won’t melt or slide.
- Beat unsalted butter until creamy so the frosting starts smooth.
- Gradually add powdered sugar, mixing until thick and spreadable.
- Mix in heavy cream and vanilla extract until the buttercream is silky.
- Divide the frosting into three bowls, then tint one bowl red and one bowl blue and leave one bowl white.
- Place the red, white, and blue frostings side by side in a piping bag to create the swirl effect.
- Pipe patriotic swirls onto the cooled cupcakes for a bright, layered look.
- Finish with patriotic sprinkles and red, white, and blue star sprinkles, then serve.
