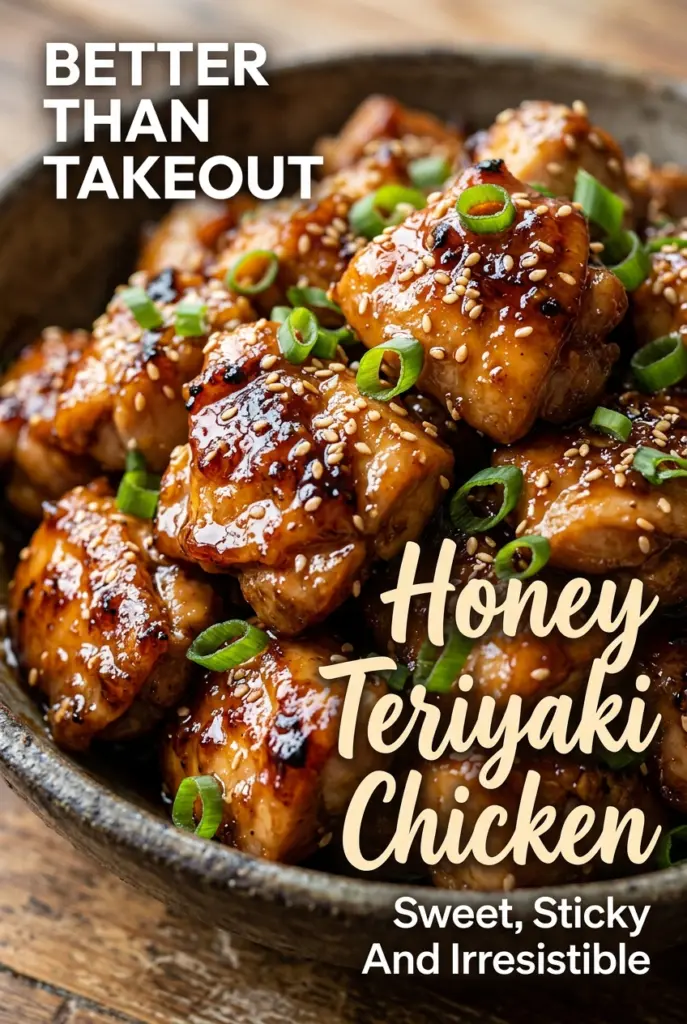
Honey Teriyaki Chicken
Sticky honey teriyaki chicken earns its place in the weeknight rotation because it gives you that glossy, takeout-style sauce without relying on a jar. The chicken stays juicy, the glaze…
Tip: save now, cook later.Sticky honey teriyaki chicken earns its place in the weeknight rotation because it gives you that glossy, takeout-style sauce without relying on a jar. The chicken stays juicy, the glaze clings instead of pooling, and every bite hits that sweet-salty-garlicky balance that makes people go back for seconds before the pan even reaches the table.
What makes this version work is the order of operations. Browning the chicken first builds flavor in the skillet, and the sauce comes together in the same pan so those browned bits melt right back into it. Honey and brown sugar give the glaze body, while a small cornstarch slurry finishes the job and turns it from thin and shiny into thick enough to coat each piece cleanly.
Below, I’ll walk through the part that matters most: how to keep the sauce glossy instead of grainy, how long to simmer it before it tightens, and what to do if you want to change the cut of chicken or make it gluten-free.
The sauce thickened up exactly like it should and coated every piece of chicken. I added the ginger like you suggested and it tasted better than our usual takeout.
Save this sticky honey teriyaki chicken for the nights when you want a glossy homemade glaze with barely any cleanup.
The Reason the Sauce Turns Glossy Instead of Watery
A lot of teriyaki chicken ends up thin because the sauce gets added before the chicken has any color, or because it’s boiled hard once the thickener goes in. Both mistakes work against you. You want gentle heat, a little patience, and enough skillet residue from the chicken to deepen the flavor.
The cornstarch slurry needs a simmer, not a rolling boil. If the sauce is still loose after a minute or two, keep it at a steady bubble and it will tighten as the starch hydrates. If it turns past glossy into paste-like, the heat was too high or the slurry was added too quickly. Pulling the pan off the burner for a moment before stirring in the slurry gives you more control.
- Chicken thighs — Thighs stay tender and forgiving in this kind of sticky glaze. Breasts can work, but they dry out faster and need a shorter cooking time.
- Low-sodium soy sauce — This keeps the glaze salty without tipping over the edge once the honey and brown sugar reduce. Regular soy sauce can work, but cut back on any extra salt elsewhere.
- Honey and brown sugar — Honey gives the sauce that rounded shine, while brown sugar adds depth and helps the glaze cling. You need both here for the right texture; swapping in all honey makes the sauce thinner and a little sharper.
- Rice vinegar — This keeps the sauce from tasting flat. If you don’t have it, apple cider vinegar is the closest swap, but use a touch less because it bites a little harder.
- Fresh ginger and garlic — Fresh is worth it. The jarred versions work in a pinch, but the sauce tastes cleaner and brighter when you grate or mince them right before cooking.
- Cornstarch — This is what turns the sauce from glossy to properly sticky. Arrowroot can stand in, but add it at the end and don’t let it boil too hard.
Building the Glaze Without Breaking the Chicken
Browning the Chicken First
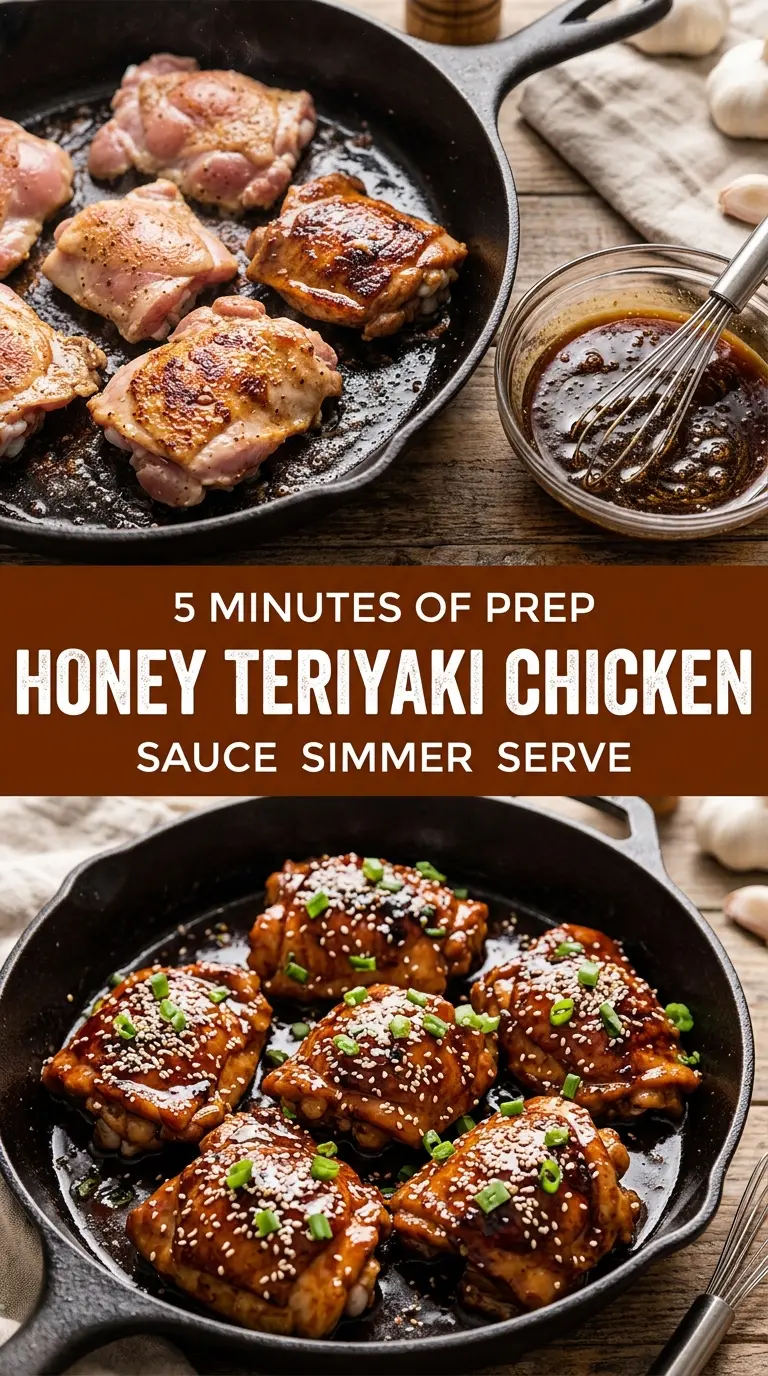
Heat the oil in a large skillet until it shimmers, then add the chicken in a single layer. Let it sit long enough to pick up color before stirring; if you move it too soon, it will steam and lose that edge of flavor. You’re looking for golden pieces with browned spots on the bottom, not pale meat floating in juices.
Mixing the Sauce in One Bowl
Whisk the soy sauce, honey, brown sugar, rice vinegar, garlic, ginger, and sesame oil until the sugar looks mostly dissolved. This keeps the sauce from catching unevenly in the skillet. If the honey sits in a lump at the bottom of the bowl, it’ll take longer to come together in the pan.
Letting the Cornstarch Finish the Job
Once the sauce is simmering around the chicken, stir in the cornstarch slurry and keep the pan moving. The sauce will go from thin and noisy to thick and shiny in a few minutes. Don’t walk away here, because once it starts to tighten, it can go from perfect to clumpy fast.
Finishing With Sesame and Green Onion
Take the pan off the heat as soon as the sauce coats the chicken in a smooth sheen. The sesame seeds add a little nutty crunch, and the green onions bring freshness that cuts through the sweet glaze. If you add the garnish too early, the onions wilt and the sesame seeds lose their snap.
Three Ways to Adapt This Honey Teriyaki Chicken
Gluten-Free Version
Swap the soy sauce for tamari or a certified gluten-free soy sauce. The flavor stays close to the original, and the rest of the recipe doesn’t need to change. Just check that your cornstarch and sesame oil are also labeled gluten-free if cross-contamination matters to you.
Chicken Breast Instead of Thighs
Use bite-sized breast pieces if that’s what you have, but cook them just until they’re no longer pink in the center. Breasts lean out fast, so they need less time in the skillet and a little extra attention when the sauce thickens. You’ll get a slightly lighter texture, but the glaze still carries the dish.
Lower-Sugar Version
Cut the brown sugar in half and keep the honey. The sauce will still be glossy and sweet, but it won’t reduce into quite as thick a coating, so let it simmer another minute or two before serving. Going sugar-free entirely changes the texture more than the flavor, and the glaze won’t cling the same way.
Storage and Reheating
- Refrigerator: Store in an airtight container for up to 4 days. The sauce will thicken more as it sits, but the flavor holds up well.
- Freezer: It freezes well for about 2 months. Cool it completely first, then pack it in a freezer-safe container with a little room for expansion.
- Reheating: Warm it gently in a skillet over low heat with a splash of water to loosen the glaze. The common mistake is blasting it in the microwave until the sauce turns sticky and the chicken dries out.
Answers to the Questions Worth Asking

Honey Teriyaki Chicken
Ingredients
Equipment
Method
- Heat the olive oil in a large skillet over medium-high heat until shimmering. Add the chicken pieces and cook until golden brown, stirring occasionally so they color evenly.
- In a bowl, whisk the low-sodium soy sauce, honey, brown sugar, rice vinegar, garlic, ginger, and sesame oil until smooth. Pour the sauce over the chicken, then bring it to a gentle simmer.
- Mix the cornstarch and water in a small bowl to make a slurry. Stir the slurry into the skillet and cook for 3–4 minutes until the sauce becomes thick and glossy.
- Remove the skillet from the heat. Garnish with sesame seeds and green onions, then serve the chicken over steamed rice.
