

Homemade Christmas Rocky Road Candy
The chocolate is still glossy when the red and green candies start peeking through the mix, and that’s when this candy begins to look like a holiday treat instead of…
Tip: save now, cook later.The chocolate is still glossy when the red and green candies start peeking through the mix, and that’s when this candy begins to look like a holiday treat instead of a bowl of ingredients. I make Homemade Christmas Rocky Road Candy when I want something festive without turning on the oven or fussing with a candy thermometer. Each piece brings together soft marshmallow, salty peanuts, and chocolate in a firm, easy-to-share square.
The texture depends on letting the melted chocolate cool a little before the mix-ins go in. I used to rush that part, and the marshmallows lost their shape before the candy had even reached the pan. A short pause keeps the pieces distinct, so every square has those clear pops of color and a mix of soft and crunchy bites.

Kitchen Note
Leave parchment overhanging two opposite sides of the pan. Once the candy is firm, those edges give you a steady grip to lift out the whole slab without digging at the corners.
Save this Homemade Christmas Rocky Road Candy for a no-bake holiday treat with soft marshmallows, salty peanuts, and festive red-and-green crunch.
Why the Chocolate Should Feel Warm, Not Hot, Before the Marshmallows Go In
Rocky road needs the chocolate to coat its mix-ins, not cook them. If the chocolate is too hot, the mini marshmallows can soften and smear as you fold, and the candy-coated pieces may lose their crisp edges. The finished candy still sets, but the cross-section looks muddier and the soft marshmallow bites are harder to pick out.
Letting the bowl rest after melting gives the chocolate a chance to settle down while it stays fluid enough to stir. You’re looking for chocolate that pours and folds easily, but doesn’t feel hot when you stir it. That small difference gives the marshmallows and candy-coated chocolates a better chance of holding their shape all the way through chilling. It also makes the mixture easier to spread without crushing the softer pieces.
What the Chips, Marshmallows, Peanuts, and Candies Each Contribute
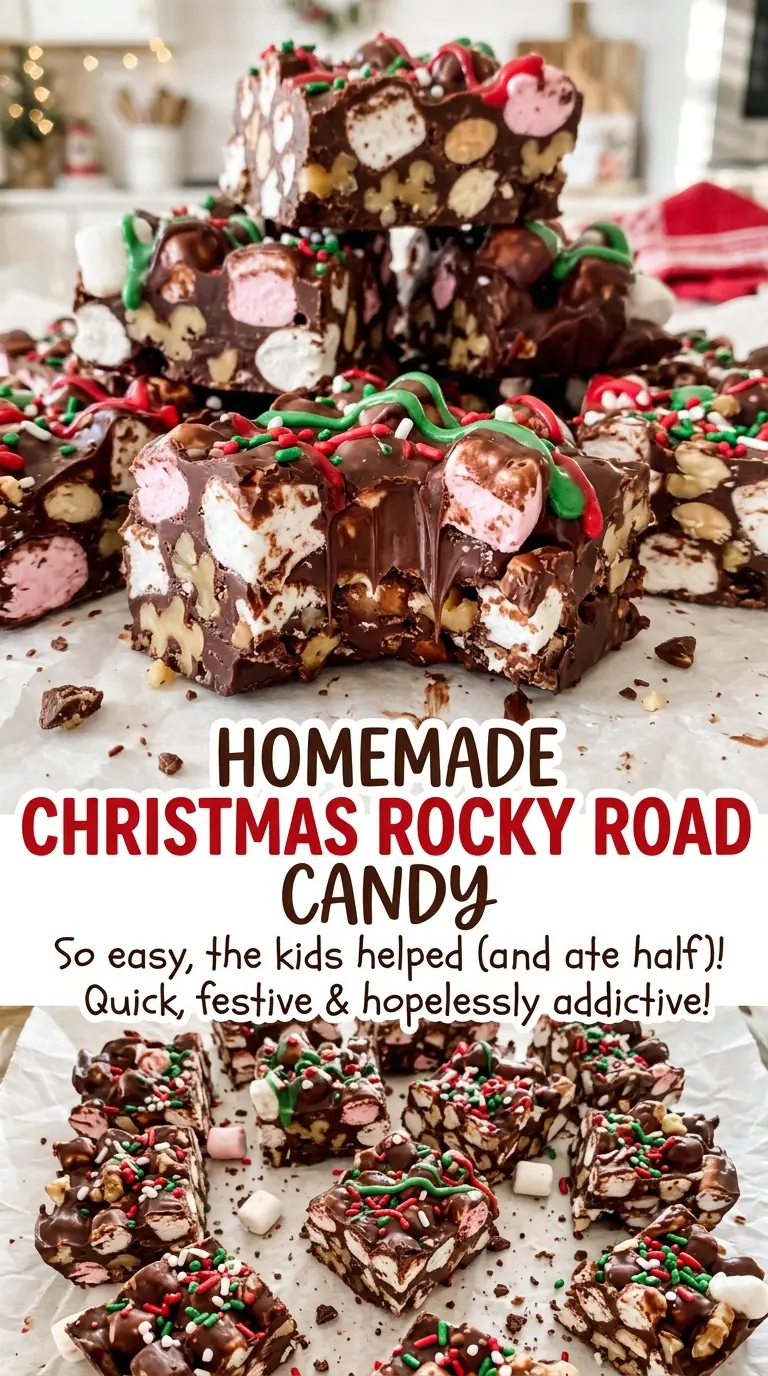
- Semisweet chocolate chips — The chocolate sets into the base that holds the other pieces together, while its less-sweet taste balances the candy and marshmallows. A standard grocery-store bag works well here; a premium brand isn’t necessary. If you’re out of chips, chopped semisweet chocolate can replace them by weight, but it may melt faster, so keep stirring and watch the bowl closely.
- Mini marshmallows — Their small size spreads soft, pillowy bites throughout the slab instead of leaving a few oversized pockets. Fresh, springy marshmallows fold in more cleanly than ones that feel dry or stiff. Full-size marshmallows can stand in if you cut them into pieces about the size of minis before folding them in.
- Dry-roasted salted peanuts — The peanuts bring a firm crunch and a salty note that keeps each bite from tasting one-note sweet. The dry-roasted kind is already crisp and ready to use, so there’s no need to toast them first. A fresh, crunchy package matters more than an expensive brand.
- Red and green candy-coated chocolates — The crisp shells add another texture and make the cut pieces look unmistakably festive. Any standard candy-coated chocolates work; choose pieces with intact shells rather than cracked ones. Keep them dry before mixing so moisture doesn’t interfere with the melted chocolate.
The Four Small Stages That Keep the Slab Easy to Cut
Line the Square Pan for a Clean Lift
Line a 9-inch square baking pan with parchment, leaving enough overhang to lift the candy out later. Press the paper into the corners so the chocolate mixture has a clear, even space to fill. A wrinkle in the parchment won’t ruin the candy, but flattening it now helps keep the slab’s edges neat.
Melt the Chips in Short, Gentle Bursts
Put the chocolate chips in a microwave-safe bowl and heat them at 50% power in 30-second bursts. Stir after every burst, even when some chips still look solid, because the warm chocolate around them helps them melt. Continue until the mixture is smooth, about 1 1/2 to 2 1/2 minutes total. Long, uninterrupted heating is the easiest way to scorch the chocolate before it looks fully melted.
Fold the Mix-Ins Through the Chocolate
Let the melted chocolate cool for 5 to 10 minutes, stirring occasionally, until it’s warm but not hot. Fold in the mini marshmallows, peanuts, and candy-coated chocolates until the pieces are coated and spread through the bowl. Use a broad, gentle folding motion rather than beating the mixture; hard stirring can squash marshmallows and crack candy shells. Spread the mixture evenly in the lined pan.
Chill Until Firm, Then Cut
Refrigerate the pan for 1 to 2 hours, until the slab feels firm rather than soft in the middle. If it still gives when you press lightly, leave it in the refrigerator longer before lifting it out. Once firm, use the parchment to lift the candy from the pan and cut it into 25 pieces. Waiting for a solid set makes the squares easier to separate instead of dragging through the mix-ins.
Color, Crunch, and Shape Changes That Still Keep the Candy Simple
Leave Out the Peanuts for a Nut-Free Adaptation
Omit the peanuts and keep the remaining ingredients the same. The candy will have less crunch and lose the salty contrast, but the chocolate still holds the marshmallows and candies together. For an allergy-sensitive batch, check every package for peanut cross-contact and use clean equipment; omitting peanuts alone doesn’t make packaged chocolate or candies safe for someone with a severe allergy.
Choose a Different Candy-Coated Color Mix
Use the same candy-coated chocolates in another color combination when you want this treat to suit a different occasion. The candy’s crunch stays the same, while the finished slab loses its red-and-green Christmas look. Keep the candy-coated pieces dry before they go into the chocolate.
Cut Smaller Pieces for a Candy Tray
For smaller, bite-size pieces, cut the chilled slab into more than 25 portions. Each piece will be easier to pick up alongside other treats, though the mix-ins won’t land in exactly the same pattern in every bite. Use the same chilled slab; only the finished piece size changes.
Storage and Reheating
- Refrigerator: Store the pieces in an airtight container for up to 1 week. They’ll stay quite firm while chilled.
- Freezer: Freeze in an airtight container for up to 2 months. Let the candy thaw in the refrigerator while still wrapped to limit condensation on the chocolate.
- Reheating: No reheating is needed. Let refrigerated pieces sit at room temperature for about 10 minutes before serving; don’t microwave them, since the chocolate can soften unevenly.
Questions That Come Up When Making Rocky Road Candy
Homemade Christmas Rocky Road Candy
Ingredients
Equipment
Method
- Line a 9-inch square baking pan with parchment paper, leaving enough overhang to lift out the candy.
- Put the chocolate chips in a microwave-safe bowl and microwave at 50% power in 30-second bursts, stirring after each, until smooth, about 1 1/2 to 2 1/2 minutes.
- Let the melted chocolate cool for 5 to 10 minutes, stirring occasionally, until warm but not hot.
- Fold the mini marshmallows, peanuts, and candy-coated chocolates into the melted chocolate.
- Spread the mixture evenly in the prepared pan.
- Refrigerate for 1 to 2 hours, until firm.
- Lift the candy from the pan and cut into 25 pieces.
