

Chocolate French Silk Pie
A pie crust can look golden around the edge and still feel soft underneath, so I watch for color across the whole shell before filling it. That crisp base matters…
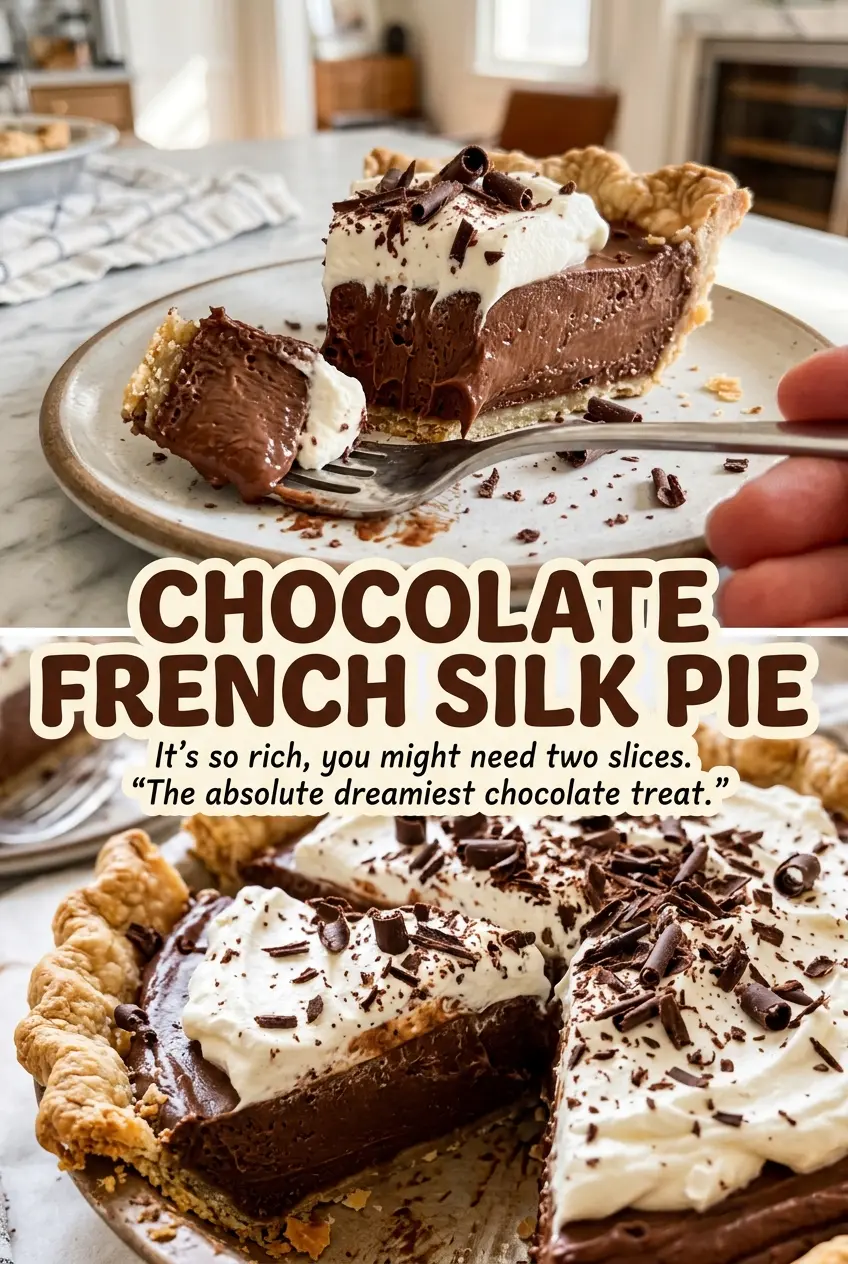
Tip: save now, cook later.A pie crust can look golden around the edge and still feel soft underneath, so I watch for color across the whole shell before filling it. That crisp base matters in Chocolate French Silk Pie, where the center is rich, cool, and smooth enough to make each slice feel like its own little occasion.
I like how this pie balances a shortcut crust with a filling that gets its texture from careful mixing. The chocolate comes through clearly, while a soft layer of whipped cream keeps each bite from feeling too heavy.
It serves eight, and the contrast is what makes it memorable: a delicate, creamy center against a firm pastry shell, with just enough airy cream on top. Served cold, it cuts into a proper slice without losing that silky feel.
Kitchen Note
I let the melted chocolate cool until it’s just lukewarm before it goes near the butter. If it’s hot, it can soften the butter and make the filling harder to whip light; lukewarm chocolate blends in without that problem.
Save this Chocolate French Silk Pie for its silky chocolate filling and cool whipped cream topping.
The Filling Gets Its Structure From Beating, Not Baking
French silk filling doesn’t set in the oven. There’s no flour or starch in the mixture to give it body, so its texture comes from working air into the butter and sugar, then beating the eggs thoroughly into that base. Once the pie is chilled, that airy mixture firms enough to slice while staying soft on the fork.
That’s also why this filling shouldn’t be treated like a quick pudding you stir together and pour into a shell. The butter and sugar need to become light before the chocolate goes in, and the eggs need their own time to blend into the mixture. Rush those stages and you’re more likely to end up with a dense filling instead of the delicate, mousse-like texture French silk is known for.
The finished pie is rich, but it shouldn’t feel heavy or waxy. A well-mixed center has a smooth look and a soft, creamy bite; the whipped cream adds a lighter finish rather than trying to cover up the chocolate.
Why Pasteurized Eggs and Semisweet Chocolate Matter in This Pie

- Semisweet chocolate — It supplies the pie’s main chocolate flavor, so choose a bar whose taste you enjoy on its own. Chop it into small, fairly even pieces so it melts consistently in the microwave; a bargain bar is fine if it tastes good and melts smoothly.
- Unsalted butter and granulated sugar — These are the base that gets beaten until light and fluffy, giving the filling its body. The butter should be softened enough to beat smoothly, not melted or greasy; unsalted butter also keeps the sweetness and chocolate in balance without extra salt.
- Pasteurized eggs — They’re mixed into the filling after the chocolate and the filling isn’t baked afterward, so keep the pasteurized eggs in the ingredient lineup. Room-temperature eggs blend into the butter mixture more evenly than cold ones.
- Refrigerated pie crust — The ready-to-use crust keeps the preparation manageable, but it still needs to be blind-baked before the filling goes in. The shell should be completely cool first, or the warm pastry can soften under the filling.
- Heavy cream and confectioners’ sugar — Cold heavy cream whips into the soft cap that balances the chocolate. Confectioners’ sugar dissolves easily into the cream, so the topping stays smooth instead of gritty.
- Vanilla extract — It rounds out the chocolate without taking over. Measure it before mixing so it can go in with the melted chocolate rather than leaving the filling waiting while you search the pantry.
Build the Pie in Stages for a Crisp Shell and Silky Center
Blind-Bake the Crust Until Golden
Heat the oven to 400°F and fit the refrigerated crust into a 9-inch pie plate, crimping the edges. Line it with parchment and fill it with pie weights so the base stays in place during its first bake. Bake for 15 minutes, then carefully remove the parchment and weights and return the crust to the oven for 5 to 8 minutes, until golden. Let the shell cool completely before adding filling; even a warm base can soften the pastry.
Melt the Chocolate Gently
Put the chopped semisweet chocolate in a microwave-safe bowl and heat it in 20-second bursts, stirring between each one. The pieces may keep their shape even as they begin to melt, so stir before deciding it needs another burst. Stop when the chocolate is smooth, then let it cool until lukewarm. Hot chocolate can loosen the softened butter when it’s mixed in, so don’t rush this short cooling pause.
Whip the Butter, Sugar, and Chocolate Together
In a large bowl, beat the softened butter and granulated sugar with an electric mixer on medium-high for 3 to 4 minutes. Look for a noticeably lighter, fluffy mixture rather than a compact paste. Beat in the melted chocolate and vanilla until evenly combined, scraping down the bowl if you see streaks clinging to the sides. If the mixture looks patchy, give it another brief mix before moving on.
Give Each Egg Time to Blend In
Beat in the eggs one at a time on medium-high speed, beating for 5 minutes after each addition. The long mixing time is part of the texture, not an optional extra, so don’t add the next egg while the previous one is still being incorporated. Once the filling looks smooth and cohesive, spread it into the completely cooled crust. A few chocolate streaks at this point mean the mixture needs more mixing.
Chill the Pie, Then Finish the Top
Cover the pie loosely and refrigerate it for at least 4 hours, until the filling is set. For the topping, beat the cold heavy cream and confectioners’ sugar in a chilled bowl for about 2 to 3 minutes, stopping when medium peaks form. The cream should hold its shape without turning stiff or grainy. Spread it over the pie before serving.
Two Simple Ways to Change the Chocolate Pie’s Finish
Choose a bolder semisweet chocolate
Stay within semisweet chocolate, but choose one with a deeper cocoa taste if you want a less sweet, more assertive center. The pie will still have the same creamy texture, while the chocolate comes through more prominently against the whipped cream.
Serve the filling without its cream cap
Leave off the whipped cream topping for a more direct chocolate finish. The pie tastes richer and the center feels denser without that airy layer, but the filling and crust need no other changes.
Storage and Reheating
- Refrigerator: Keep the pie covered in the refrigerator for up to 3 days. The whipped cream may lose some definition, and cut edges can dry slightly.
- Freezer: I don’t recommend freezing the finished pie; thawing can soften the crust and affect the whipped cream’s texture.
- Reheating: Serve it chilled rather than reheating. Warmth softens the butter-based filling and takes away the clean, sliceable texture.
Questions I Get Asked About Chocolate French Silk Pie
Chocolate French Silk Pie
Ingredients
Equipment
Method
- Preheat the oven to 400°F.
- Fit the pie crust into a 9-inch pie plate and crimp the edges.
- Line the crust with parchment and fill it with pie weights.
- Bake for 15 minutes.
- Remove the parchment and weights, then bake for 5 to 8 minutes more, until golden.
- Cool completely.
- Melt the chocolate in the microwave in 20-second bursts, stirring between bursts.
- Cool the melted chocolate until lukewarm.
- In a large bowl with an electric mixer, beat the butter and granulated sugar on medium-high speed for 3 to 4 minutes, until light and fluffy.
- Beat in the melted chocolate and vanilla.
- Beat in the eggs one at a time on medium-high speed, beating for 5 minutes after each addition.
- Spread the filling in the cooled crust.
- Cover the pie loosely and refrigerate for at least 4 hours, until the filling is set.
- Beat the heavy cream and confectioners' sugar in a chilled bowl until medium peaks form, about 2 to 3 minutes.
- Spread the whipped cream over the pie before serving.