Cheddar Jalapeño Sourdough Bread
Cheddar jalapeño sourdough earns its spot in the rotation because it gives you everything you want from a good homemade loaf: a crackly crust, an open tangy crumb, and pockets…
Tip: save now, cook later.Cheddar jalapeño sourdough earns its spot in the rotation because it gives you everything you want from a good homemade loaf: a crackly crust, an open tangy crumb, and pockets of sharp cheese that melt into the dough instead of sitting on top like an afterthought. The jalapeños bring a clean bite without turning the whole loaf into heat for heat’s sake, and the sourdough base keeps the richness from feeling heavy.
The trick is treating the mix-ins like part of the dough structure, not just add-ins. Cubed cheddar gives you those gooey little pockets, while grated cheddar disappears a bit more into the crumb and seasons the whole loaf. Laminating the dough once during stretch and folds helps distribute the cheese and peppers without tearing the gluten, which matters more here than in a plain boule. If you’ve ever had a filled loaf burst open at the seam or turn dense around the add-ins, this method fixes a lot of that.
Below, I’ll walk through the timing that matters most, how to keep the jalapeños from making the dough slippery, and a few smart swaps if you want to dial the heat up or down.
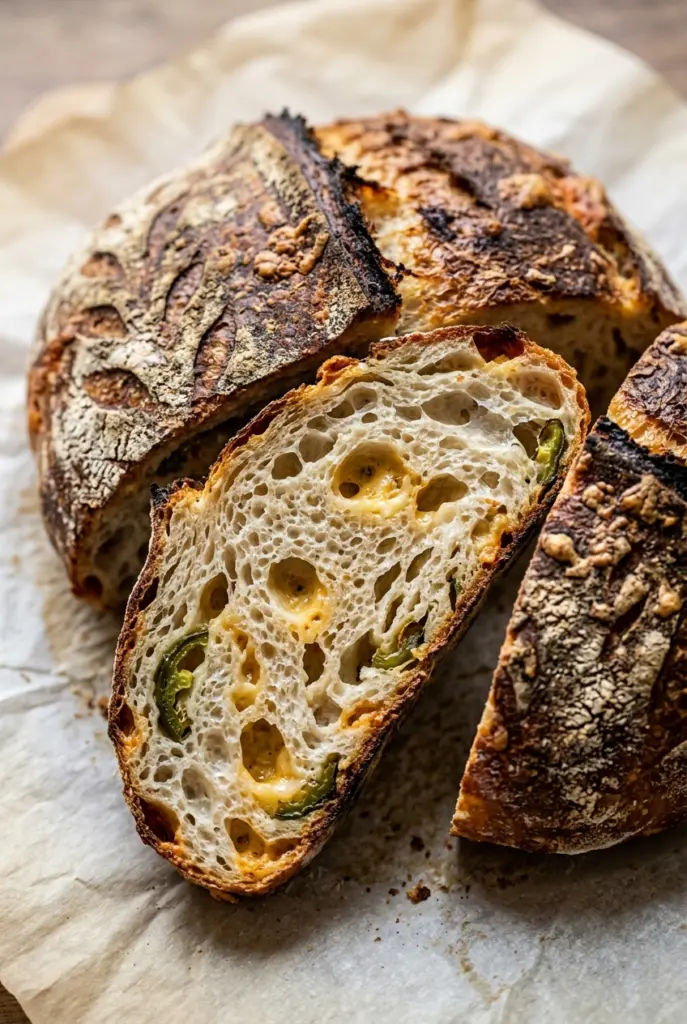
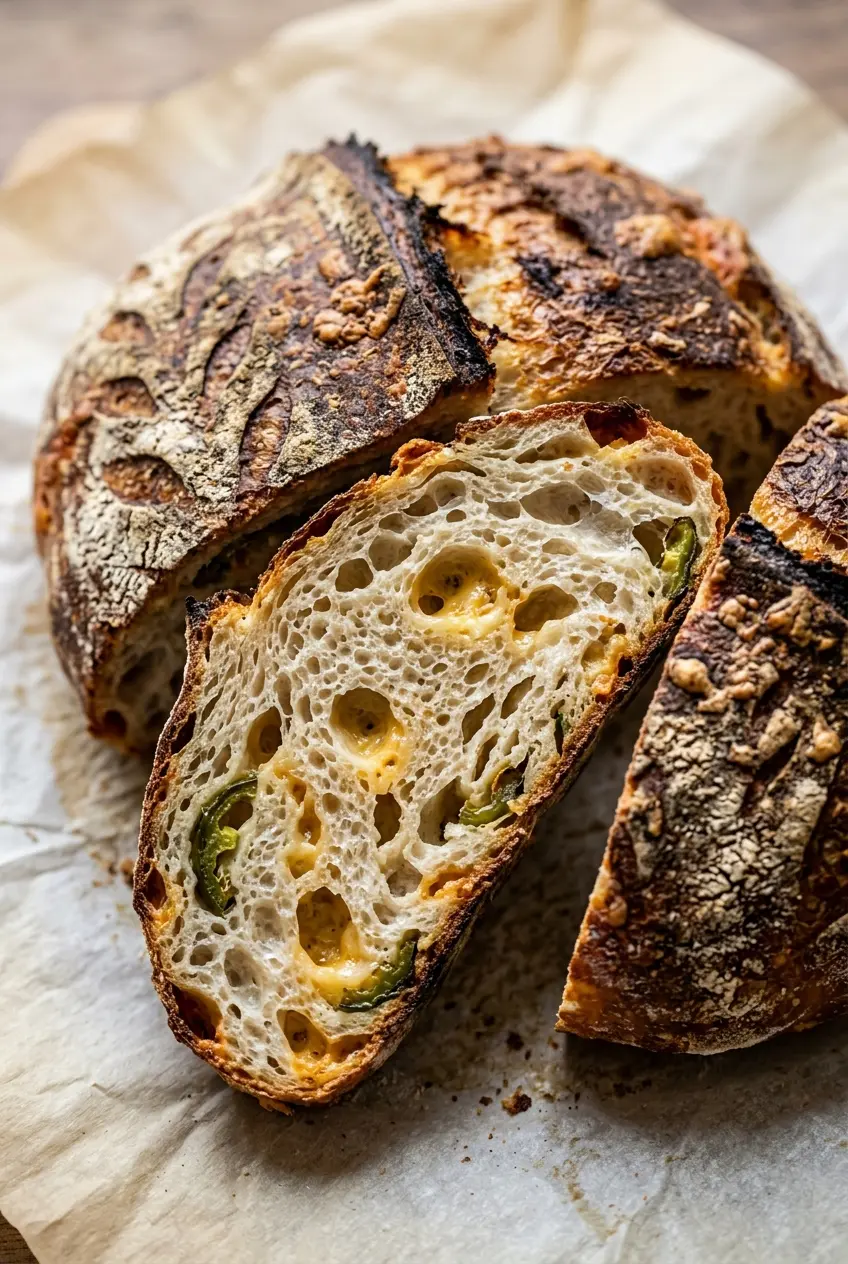
The cheese melted into these perfect little pockets and the jalapeños gave it a nice kick without overwhelming the sourdough. I loved that the crumb stayed open even with all the mix-ins, and the crust came out crackly every time.
Save this cheddar jalapeño sourdough for the bake day when you want a crackly crust, stretchy cheese pockets, and a little heat in every slice.
The Real Reason Cheddar Loaves Go Dense Around the Filling
Most cheddar sourdough problems start before the oven ever turns on. Cheese adds weight, jalapeños add moisture, and both can drag down the structure if you dump them in too early or knead them in too hard. That’s how you end up with tight spots, gummy tunnels, or a loaf that spreads instead of springing.
Lamination solves a lot of that. Stretching the dough into a thin sheet and scattering the mix-ins across it lets you build layers without crushing the gluten network you already developed. The dough stays strong, the fillings distribute more evenly, and the crumb has a better shot at staying open instead of turning into a stuffed bread brick.
- Cheddar: Sharp cheddar gives you the best balance here because it still tastes bold after baking. Mild cheddar gets lost. If you grate it, you’ll get more even flavor in the crumb; if you cube it, you’ll get pockets that melt and ooze.
- Jalapeños: Fresh jalapeños keep their bite and bring that clean pepper flavor. Slice them thin so they disperse well. If you want less heat, remove the seeds and white ribs; if you want more, leave them in.
- Pickled jalapeños: These are optional, but they add tang and a little extra moisture that plays nicely with the cheddar. Don’t overdo them or the dough can get wet in spots. Pat them dry before adding.
- Bread flour: This matters. The higher protein gives the dough enough strength to hold the cheese and peppers without collapsing. All-purpose flour will work in a pinch, but the loaf will be less open and a little softer overall.
How to Build the Dough Without Smearing the Cheese Into the Crumb
Autolyse the flour and water first
Mix the flours with most of the water until there are no dry patches, then let the dough sit. That rest hydrates the flour and starts gluten development before the starter and salt go in. If you skip it, the dough needs more handling later, and that extra handling is what can tear the structure once the cheese goes in.
Work in the starter, then the salt
After the autolyse, add the starter and the remaining water, then squeeze and fold until the dough looks cohesive. Add the salt after that and mix again until the dough tightens slightly and feels smoother. If it still looks rough, give it another short rest; forcing it together too fast only makes the early folds harder.
Lamination is where the mix-ins belong
On the second set of stretch and folds, turn the dough onto a lightly damp or oiled surface and stretch it gently into a thin rectangle. Scatter the cheddar and jalapeños over the surface, then fold the dough back onto itself in layers. This is the moment that keeps the filling from clumping in one corner. If the dough tears, stop stretching and fold it back together; thin spots are fine, holes are not.
Bulk until it looks alive, not just puffy
Let the dough rise at room temperature until it’s lighter, domed, and showing bubbles along the sides. The target isn’t the clock. It’s the dough’s behavior. If you shape too early, the loaf stays tight and underproofed; if you wait until it collapses, it loses the strength needed to hold the cheese.
Score deep enough for the filling
Once the dough is cold and ready, turn it out carefully and score it with one confident slash. A weak score won’t give the loaf room to expand around the cheese, and the dough will tear wherever it wants. A clean, deliberate cut helps the oven spring lift the loaf instead of splitting it open at random spots.
Make it milder without losing the jalapeño flavor
Use seeded fresh jalapeños and skip the pickled ones. You’ll still get the pepper flavor and green brightness, but the heat stays in the background. This is the best move if you want the loaf to work for a crowd without setting anyone off.
Push the heat up a notch
Leave the seeds and white ribs in the jalapeños, then add the pickled peppers too. That gives you a sharper, more layered heat that cuts through the cheese. The loaf still bakes the same, but the finish is much bolder.
Go dairy-free
Use a meltable dairy-free cheddar-style shred, then keep the pieces a little larger so they don’t disappear completely during baking. The flavor won’t be as sharp or savory as real cheddar, but the loaf still gets those little pockets of richness and a similar visual effect.
Make it extra rustic with whole wheat
You can push the whole wheat up slightly if you want a deeper, nuttier base. The crumb will be a little tighter and the loaf will ask for a touch more water, but the earthy flavor works well with cheddar and jalapeño.
Storage and Reheating
- Refrigerator: Store sliced or whole-wrapped bread for up to 3 days. The crust softens in the fridge, and the cheese can firm up, so it’s best eaten sooner rather than later.
- Freezer: This loaf freezes well. Slice it first, wrap it tightly, and freeze for up to 2 months so you can toast pieces straight from frozen.
- Reheating: Toast slices for the best texture. If you’re warming a whole loaf, use a 325°F oven for about 10 minutes. Microwaving softens the crust and makes the cheese a little rubbery.
Answers to the Questions Worth Asking
Cheddar Jalapeño Sourdough Bread
Ingredients
Equipment
Method
- In a large bowl, mix the bread flour, whole wheat flour, and 350g of the water until just combined. Cover and rest for 45 minutes at room temperature; the dough should look slightly hydrated and shaggy.
- Add the active sourdough starter and the remaining 25g water, then squeeze the dough between your fingers until fully incorporated. Mix again after adding fine sea salt, then let rest for 30 minutes; it should feel smoother and slightly elastic.
- Coat your hands with olive oil, then perform the first set of stretch and folds. Repeat for 2 hours total with 30-minute intervals between sets.
- On the second stretch-and-fold set, laminate the dough flat and scatter the sharp cheddar cheese and medium jalapeños evenly before folding them in. Continue folding so the mix-ins distribute through the dough and it becomes more cohesive.
- Complete the remaining stretch-and-fold sets to finish the 2-hour window. The dough should look stronger, puffier, and hold shape between folds.
- Cover the dough and bulk ferment at 75–78°F for 6–10 hours, until it has risen 50–75% and is bubbly and domed. Aim for a noticeably expanded dough volume with visible fermentation bubbles.
- Turn the dough onto an unfloured surface and pre-shape into a round, then bench rest uncovered for 20–30 minutes. The surface should relax and look slightly drier as it rests.
- Final shape into a tight boule or batard, then place seam-side up in a floured banneton or a bowl lined with a floured kitchen towel. Cover so the dough doesn’t dry out.
- Cold proof in the refrigerator for 12–16 hours (or overnight). The dough should feel airy and look expanded right before baking.
- One hour before baking, place the Dutch oven in the oven and preheat to 500°F (260°C). The pot should be fully hot for maximum oven spring.
- Turn the dough out onto parchment paper and score the top with a sharp lame or razor blade, using a long curved slash. A clean, decisive cut will open the loaf as it bakes.
- Carefully lower the dough (with parchment) into the hot Dutch oven and bake covered at 500°F for 20 minutes. Look for strong rise and early crackling around the score line.
- Remove the lid and reduce heat to 450°F (230°C), then bake uncovered for 20–25 minutes. The loaf should become deep golden brown with a dry, crackly crust.
- Cool the loaf on a wire rack for at least 1–2 hours before slicing. The crumb should set and feel less gummy when pressed.
