No Bake Oreo Icebox Cake
No Bake Oreo Icebox Cake is a fun and super easy dessert that combines crunchy Oreo cookies with creamy layers of whipped cream. This cake doesn’t need an oven, which…
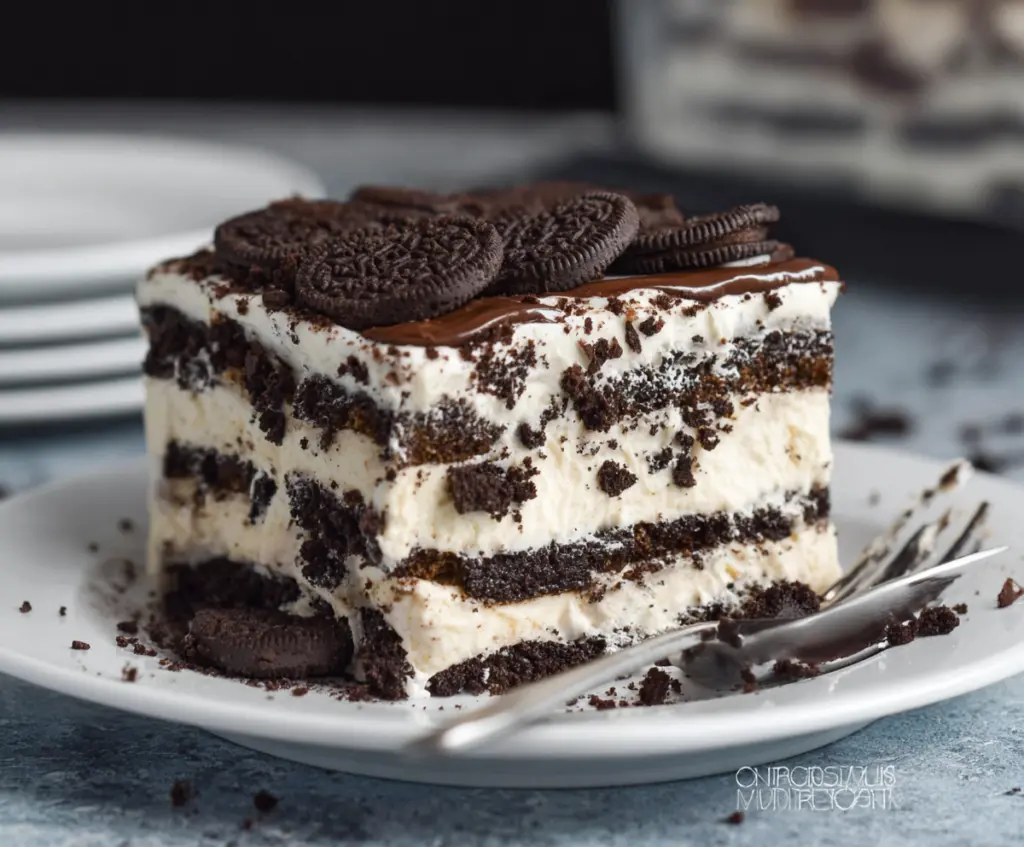
Tip: save now, cook later.No Bake Oreo Icebox Cake is a fun and super easy dessert that combines crunchy Oreo cookies with creamy layers of whipped cream. This cake doesn’t need an oven, which makes it perfect for a quick treat on a warm day or when you want something sweet without the hassle. The Oreos soften as the cake chills, giving you the best mix of cookie texture and smooth cream in every bite.
I love making this cake because it feels like a little celebration whenever I do. You just layer the cookies and cream, pop it in the fridge, and let the magic happen while it’s cooling. It’s one of those recipes where you can tell everyone brought their smile before digging in. Plus, it’s really forgiving, so you can’t really go wrong!
My favorite way to serve the Oreo Icebox Cake is straight from the fridge with a tall glass of milk. It’s a great dessert to share with friends or family, especially after a casual dinner or on a weekend afternoon. I also find that making it a day ahead makes the flavors even better, so it’s a handy dessert when you have guests or just want to treat yourself to something special at home.
Key Ingredients & Substitutions
Heavy Whipping Cream: This is what makes the cake light and creamy. For a dairy-free option, try coconut cream, but it might taste a bit different. Keep it chilled for best whipping results.
Oreos: The classic chocolate sandwich cookie is essential here. You could use other chocolate sandwich cookies if Oreos aren’t available. For a gluten-free version, look for gluten-free sandwich cookies.
Powdered Sugar & Vanilla Extract: These add sweetness and flavor to the whipped cream. You can swap powdered sugar with any fine sugar or a sugar substitute, just be sure it’s smooth to avoid grainy cream.
Chocolate Ganache (Optional): Adds a rich touch on top. You can use store-bought chocolate syrup or melted chocolate. If avoiding chocolate, a dusting of cocoa powder or chocolate chips works too.
How Do You Get the Cream to Whip Just Right for the Cake?
Whipping cream into stiff peaks is key for a stable, fluffy cake layer. Here’s how:
- Chill your bowl and beaters in the fridge before starting – cold tools help the cream whip better.
- Start whipping at medium speed, then increase as the cream thickens.
- Watch closely: Soft peaks will bend over; stiff peaks stand straight. Stop whipping as soon as stiff peaks form to avoid turning cream into butter.
Using clean, cold cream and the right timing means your whipped cream layers will be light, fluffy, and hold the cake together perfectly.
Equipment You’ll Need
- Large mixing bowl – perfect for whipping the cream without spilling.
- Electric mixer – makes it quick and easy to whip the cream to stiff peaks.
- Spatula – helps spread the whipped cream smoothly and evenly over the Oreos.
- 8×8 inch (or similar size) rectangular dish – great size for layering and chilling the cake.
- Plastic wrap – to cover the dish and keep the cake fresh while chilling.
Flavor Variations & Add-Ins
- Add peanut butter swirls to the whipped cream for a tasty twist and nutty flavor.
- Use mint Oreo cookies for a refreshing mint chocolate version, especially nice after dinner.
- Stir in crushed toffee bits or caramel sauce for a crunchy, sweet surprise in each bite.
- Try layering in fresh strawberries or banana slices to add fruitiness and freshness.

No Bake Oreo Icebox Cake
Ingredients You’ll Need:
- 3 cups heavy whipping cream, chilled
- 1/2 cup powdered sugar
- 2 teaspoons vanilla extract
- 30-35 Oreo cookies (regular size)
- 1 cup chocolate ganache or chocolate sauce (optional for topping)
- Additional Oreo cookies for garnish
How Much Time Will You Need?
This recipe takes about 15 minutes to prepare and then needs at least 6 hours (preferably overnight) in the fridge to chill and set.
Step-by-Step Instructions:
1. Whip the Cream:
In a large mixing bowl, combine the chilled heavy whipping cream, powdered sugar, and vanilla extract. Use an electric mixer to whip the cream on medium-high speed until stiff peaks form—this usually takes about 3-4 minutes. Be careful not to overwhip.
2. Layer the Cake:
Spread a thin layer of whipped cream on the bottom of a rectangular or square dish (about 8×8 inches). Arrange a layer of Oreo cookies over the cream. Feel free to use whole cookies or break some to fit evenly. Then spread a generous layer of whipped cream over the cookies, covering them completely.
Repeat these layers—Oreos, then whipped cream—until the dish is full, finishing with a thick layer of whipped cream on top.
3. Add the Finishing Touches and Chill:
If you like, drizzle chocolate ganache or sauce over the final whipped cream layer. Garnish with extra Oreo cookies, either whole or crumbled. Cover the dish with plastic wrap and refrigerate for at least 6 hours, or overnight, so the cookies soften and flavors blend.
4. Serve and Enjoy:
Cut the cake into squares and serve chilled. Enjoy this creamy, no-bake treat that tastes like a dream!
Can I Use Frozen Heavy Cream for This Recipe?
It’s best to use fresh, well-chilled heavy cream rather than frozen. If your cream is frozen, thaw it completely in the fridge before whipping to ensure it whips up properly and has the right texture.
Can I Substitute Oreos with Other Cookies?
Absolutely! You can use any chocolate sandwich cookies or even graham crackers for a different twist. Just keep in mind that texture and flavor will vary slightly.
How Long Can I Store Leftover Icebox Cake?
Store leftovers covered in the refrigerator for up to 3 days. The cake may soften further over time, but it will still taste delicious.
Can I Make This Icebox Cake Ahead of Time?
Yes! In fact, it’s best to make it the day before serving. Letting the cake chill overnight makes the cookies tender and the flavors meld beautifully.
